PIC programmer works!! (eventually…)
 It took a while to get working, but I’ve finally got the PIC programmer working perfectly with my PC!
I’ve included the final circuit below, I can confirm that this works 100%, with Winpic PIC programming software, using NOPPP.ini that is included with Winpic (don’t bother with the NOPPP software on the official site). You can write and read code from the PIC, it works a treat!
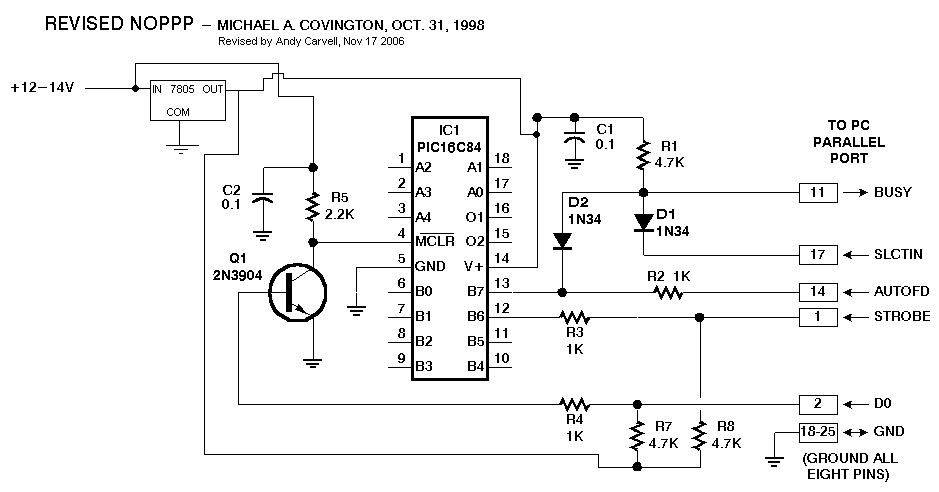
The reason it took a while to get working was the fact that one of the resistors in the NOPPP schematic was causing the logic levels on the input to the parallel port to be a little on the low side, meaning that the 1’s and 0’s weren’t being read into the parallel port correctly. The resistor in question is R6, which I’ve removed from the schematic linked to below. I’ve also added the 7805 voltage regulator that I talked about previously into the schematic.
 I constructed a simple test circuit on the corner of some stripboard and came up with some simple code to flash an LED to confirm that the PIC was being programmed correctly, it was! If you’re not sure how to write code for PICs, then I’d recommend the PIC Tutorial, this will show you how to construct a simple test circuit for your PIC, and give you all the information you need to know to start learning how to program your own PIC.
The final PIC Programmer circuit that I used and can confirm works perfectly is given below. It’s important to note that the power supply for the circuit must be at least 12.0v, if your power supply provides 11.9v then it’s likely that your PIC will be programmed, as the 12v is used as a signal for the PIC to initiate the programming sequence.
Revised, working NOPPP schematic:
Next on my to-do list is to come up with a simple receiver circuit to receive, amplify and demodulate the 60kHz time code signal that will eventually be fed into one of the PIC’s input ports. I suspect that this will take a while, based on the fact that my only (realistic) component supplier is Maplin Electronics. Maplin have become notably poor in recent years for supplying electronic components, discontinuing hundreds and hundreds of components in order to replace them with stuff you can buy from Argos, hey ho!
I’ll get to work on a 60kHz receiver circuit!
 The first thing on my to do list is to make a PIC Programmer, so that I will eventually be able to get the code I develop for decoding the time signal from my PC onto a PIC.